SuperFetch is a significant but less known feature of Windows. As a Windows user, if you are aware of this in-built function, you can use it to your advantage. So, we have put together this guide to cover every little aspect of SuperFetch – what it is, how it functions, can it cause any issues, should it be disabled if it leads to any problems and how to disable or enable Superfetch.
Table of Contents
What is Service Host SuperFetch
What is SuperFetch and How Does it Work?
SuperFetch is a feature that was first rolled out with Windows Vista. It runs in the background, continuously evaluating RAM usage footprints and tracking the categories of apps you use regularly. After identifying the pattern, SuperFetch marks these apps as “frequently used” and preloads them into RAM in advance. So, when you run these apps they will launch much more quickly as they are already preloaded in memory and do not have to be fetched from HDD. Also, it only uses unused memory. No sooner than your system requires some more memory, it releases the needed RAM space.
Remember that it is not the same as Prefetch, which is the preloading memory manager that Microsoft released with Windows XP. SuperFetch is basically an updated version of Prefetch as Prefetch did not analyze RAM usage patterns to tweak its preloading parameters suitably.
Can SuperFetch Cause Any Problems?
Although SuperFetch is mostly useful and runs smoothly, it may cause some issues:
- System startup can slow down because SuperFetch is preloading a chunk of data from your HDD to RAM.
- When Windows 10 is installed on an SSD the benefit of SuperFetch may not be apparent. This is because SSDs are so fast that preloading is not actually required.
- It can also cause performance issues while playing games that are RAM-heavy, especially on machines that have 4GB of RAM or less.
Now you must be wondering if it is ok to disable SuperFetch if so required. Yes, you can turn it off without worrying about any risks. If your machine is running smoothly, leave SuperFetch on. However, if you have issues with high HDD/RAM usage, then disable SuperFetch and check if it helps. If there is any noticeable performance gain keep it off. Otherwise, enable it again.
How to Enable or Disable SuperFetch in Windows
Method 1: Disable SuperFetch from Services
- Press Windows key+R key simultaneously to open the Run prompt.
- Type services.msc in the prompt and click OK. This will launch the Services window.

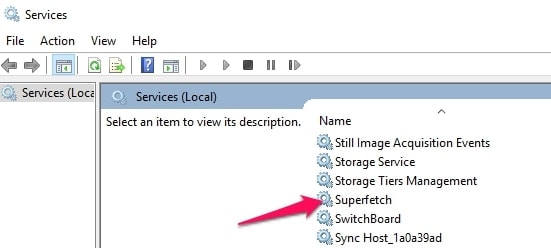
- In the Services window, scroll down to find Superfetch in the list of services. Double click on this service to configure its properties.

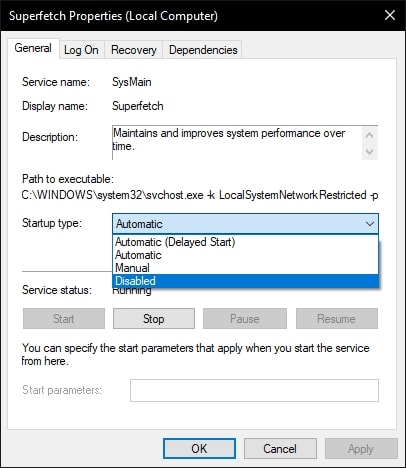
- In the Properties window, click Startup type. Its default value is set to Automatic. Select Disabled in the drop-down menu. Then click the Stop button under Service status.

- Click OK to confirm.
- In case you want to enable SuperFetch again, change the value of Startup type back to Automatic and click on the Start button under Service status.
Method 2: Disable SuperFetch via Registry Editor
- Type regedit in Start Search and hit enter to launch the Registry Editor.

- Use the left sidebar to navigate to the following registry key:
HKEY_LOCAL_MACHINESYSTEMCurrentControlSetControlSession ManagerMemory ManagementPrefetchParameters
- In the right panel, double-click on EnableSuperfetch. In case this registry value is not found there, right-click the PrefetchParameters folder, then choose New > DWORD Value.
The predefined values for EnableSuperfetch are:
- 0: Disable Superfetch
- 1: Enable apps prefetching
- 2: Enable boot prefetching
- 3: Enable prefetching of everything (default)
- Assign EnableSuperfetch 0.
- Close the Registry Editor window and restart your system.
- To enable SuperFetch again, just set EnableSuperfetch to 3.
Method 3: Disable SuperFetch using Command Prompt
- Run the command prompt as administrator.
- To disable SuperFetch copy and paste the following command and press Enter.
sc stop "SysMain" & sc config "SysMain" start=disabled
- If you want to enable SuperFetch again to copy and paste the following command and press Enter.
sc config "SysMain" start=auto & sc start "SysMain"
- Now close the command prompt window.
Method 4: Disable SuperFetch using PowerShell
- Run PowerShell as administrator.
- To disable SuperFetch copy and paste the following command and press Enter.
Stop-Service -Force -Name "SysMain"; Set-Service -Name "SysMain" -StartupType Disabled
- If you want to enable SuperFetch again copy and paste the following command and press Enter.
Set-Service -Name "SysMain" -StartupType Automatic -Status Running
- Now close the PowerShell window.
Wrapping it Up!
We listed down all possible solutions for enabling or disabling SuperFetch. If you know any other method that we may have missed, feel free to share it with us in the comment section below. Reach out to us in case of any doubts. We will be happy to help!


More Stories
11+ Best ThePiratebay3 Sites – Ultimate Pirate bay Alternatives
7movierulz iBomma – 11 Best Alternatives to Download & Watch latest Telugu Movies
How to Spam a Phone Number (7 best apps & services) with call, texts to Get Revenge?